It’s no wonder they’ve been all over Instagram lately. Spending so much time indoors and really getting to know our home spaces, we’ve all gone through phases that naturally lead to DIY: reorganising your home, making peace with your clutter and then adding to it by buying random knick-knacks – why wouldn’t you want the next change to be homemade? Plus, if everyone else on your feed can manage it, surely you can too.
But if you’re anything like us you’ve probably been burned before. As inviting as they are, DIY projects can be deceptively messy or complicated. Lucky for you, then, we’ve found a few where we can guarantee success, namely because we’ve already managed them ourselves. So if you’ve got that crafting itch, why not give these a whirl?
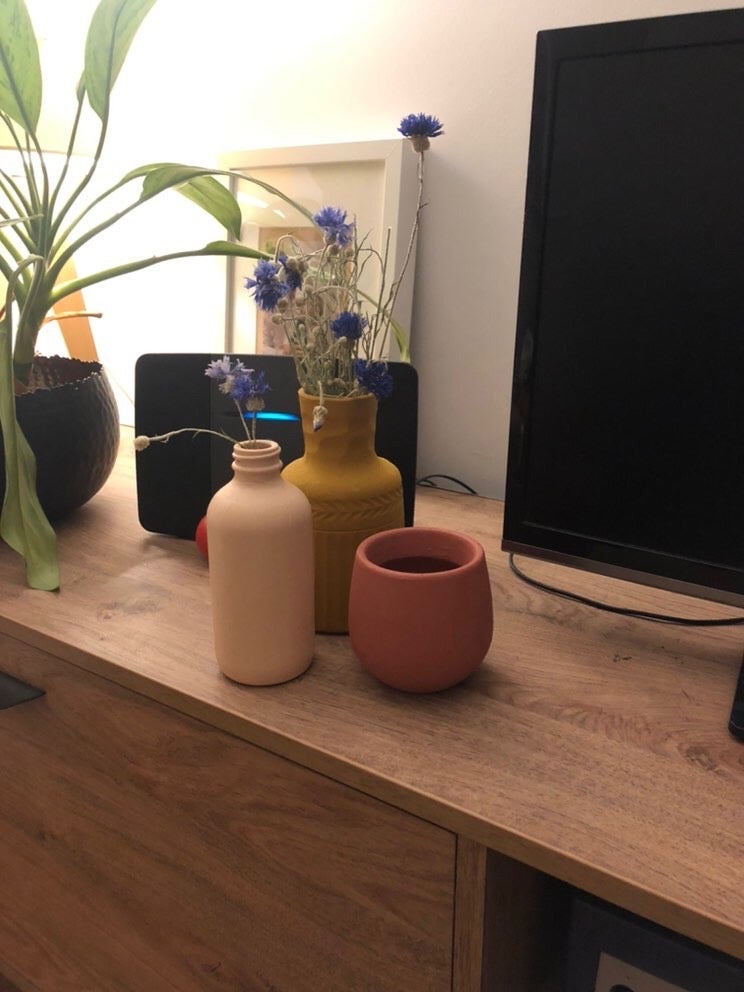
What was the process? Super simple process of adding baking powder to any water-based paints to create a terracotta effect.
How did you find the DIY? It was really easy to do actually! The only thing you need is patience – at the start I was layering up lots of paint but you need to wait for it to dry between layers to avoid piling. You can use any colour/paint and I really enjoyed mixing my own colours to suit my style.
What did you think of the results? I think it’s super effective and quite addictive – I want to paint everything in my house now! It definitely added a touch of personality and consistency to my hand-me-down homeware. I’ll be on the lookout in charity shops for more vases to give the terracotta treatment.
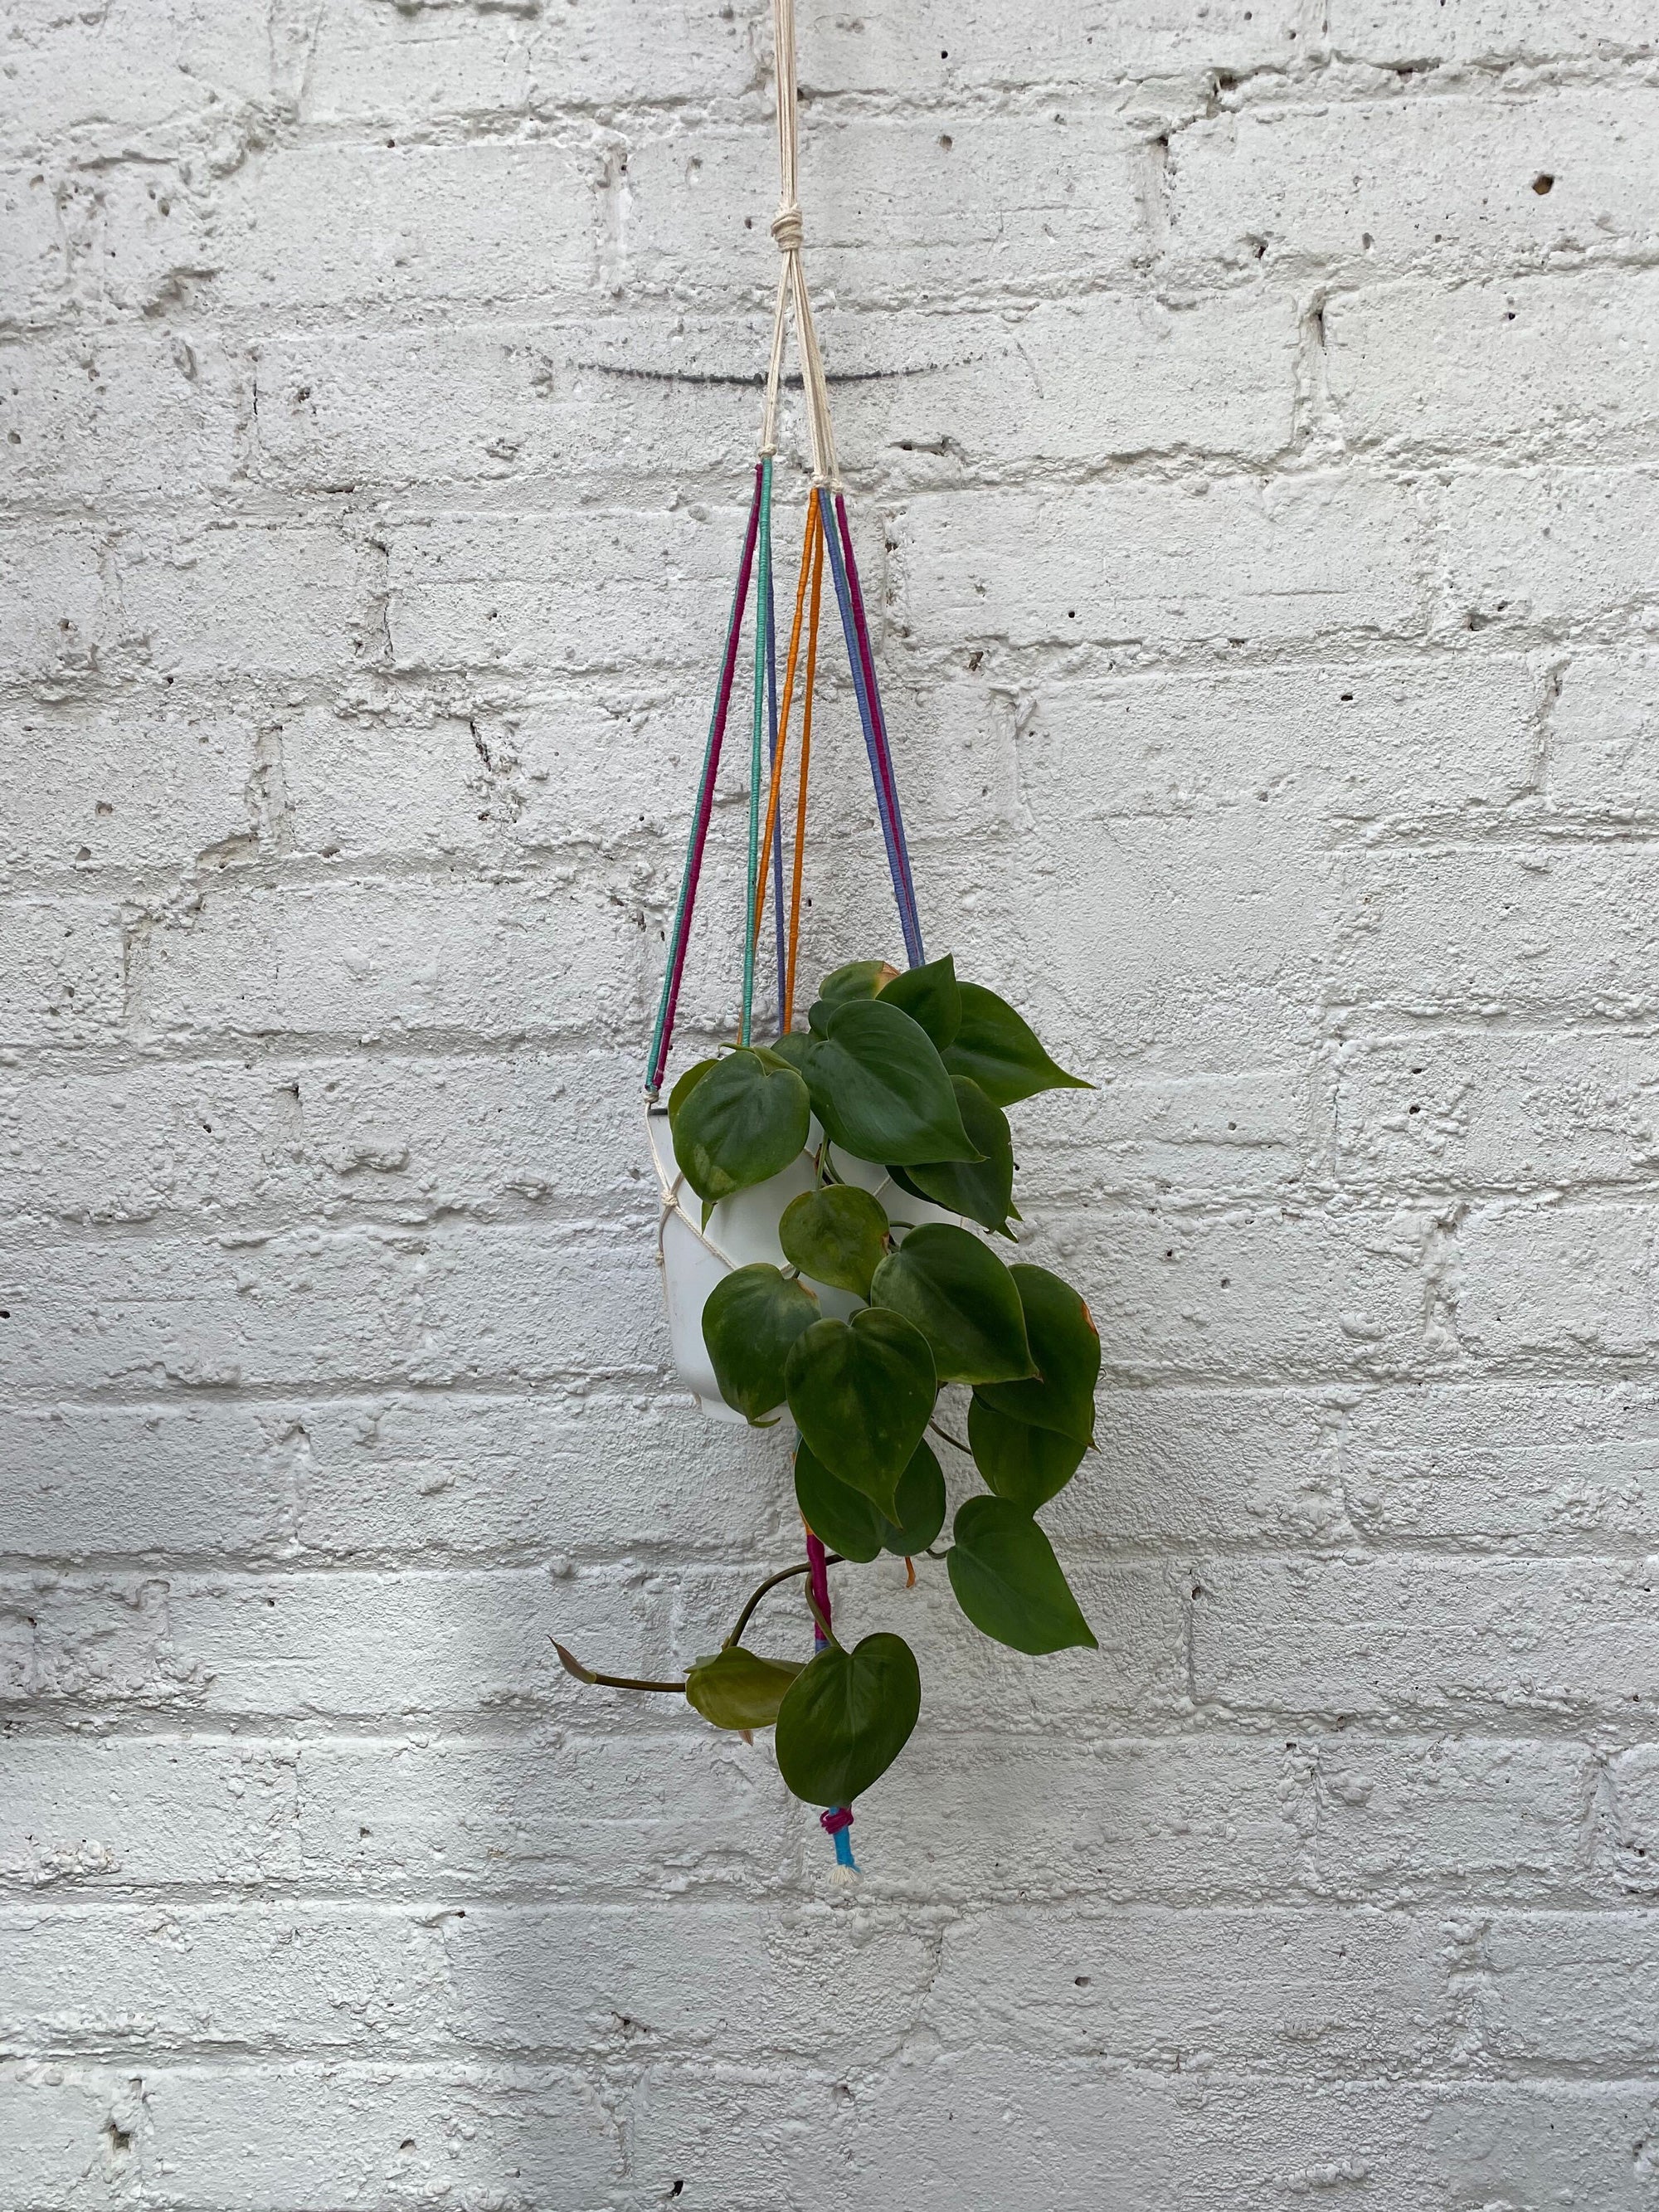
What was the process? If I’m perfectly honest, this was not the DIY I intended to make. I started out trying to make one of the very Pinterest-y 1970s ones but jfc guys, if you haven’t already tried one of these please allow me to save you a lot of time and also effort: don’t. Not only are you working with five-metre-long threads (have you got the living room space to accommodate knotting 12 of them together because I certainly don’t), it takes absolutely bloody ages. I reckon some of these macrame projects must take years. Tying tiny knots, over and over again, in order to create the perfect twisty pattern was making me lose the will to live, so I started hunting for an easier option. Which is when I found the above.
How did you find the DIY? MUCH EASIER. Just time-consuming. Tying the knots in a pattern to hold the pot was simple but wrapping the coloured thread around the white threads à la that friendship bracelet you made in Year Four took almost all of Normal People.
What did you think of the results? I’ll be honest guys, I don’t know if I’ve found the right craft for me yet. I certainly won’t be making any more hanging pots after the lacklustre result of this one. But who knows, perhaps my talents lie elsewhere, like in tie-dyeing, or clay modelling, or even glass blowing. Either way, I’m not quite ready to hang up my crafting belt (it’s a thing) just yet, so watch this space.
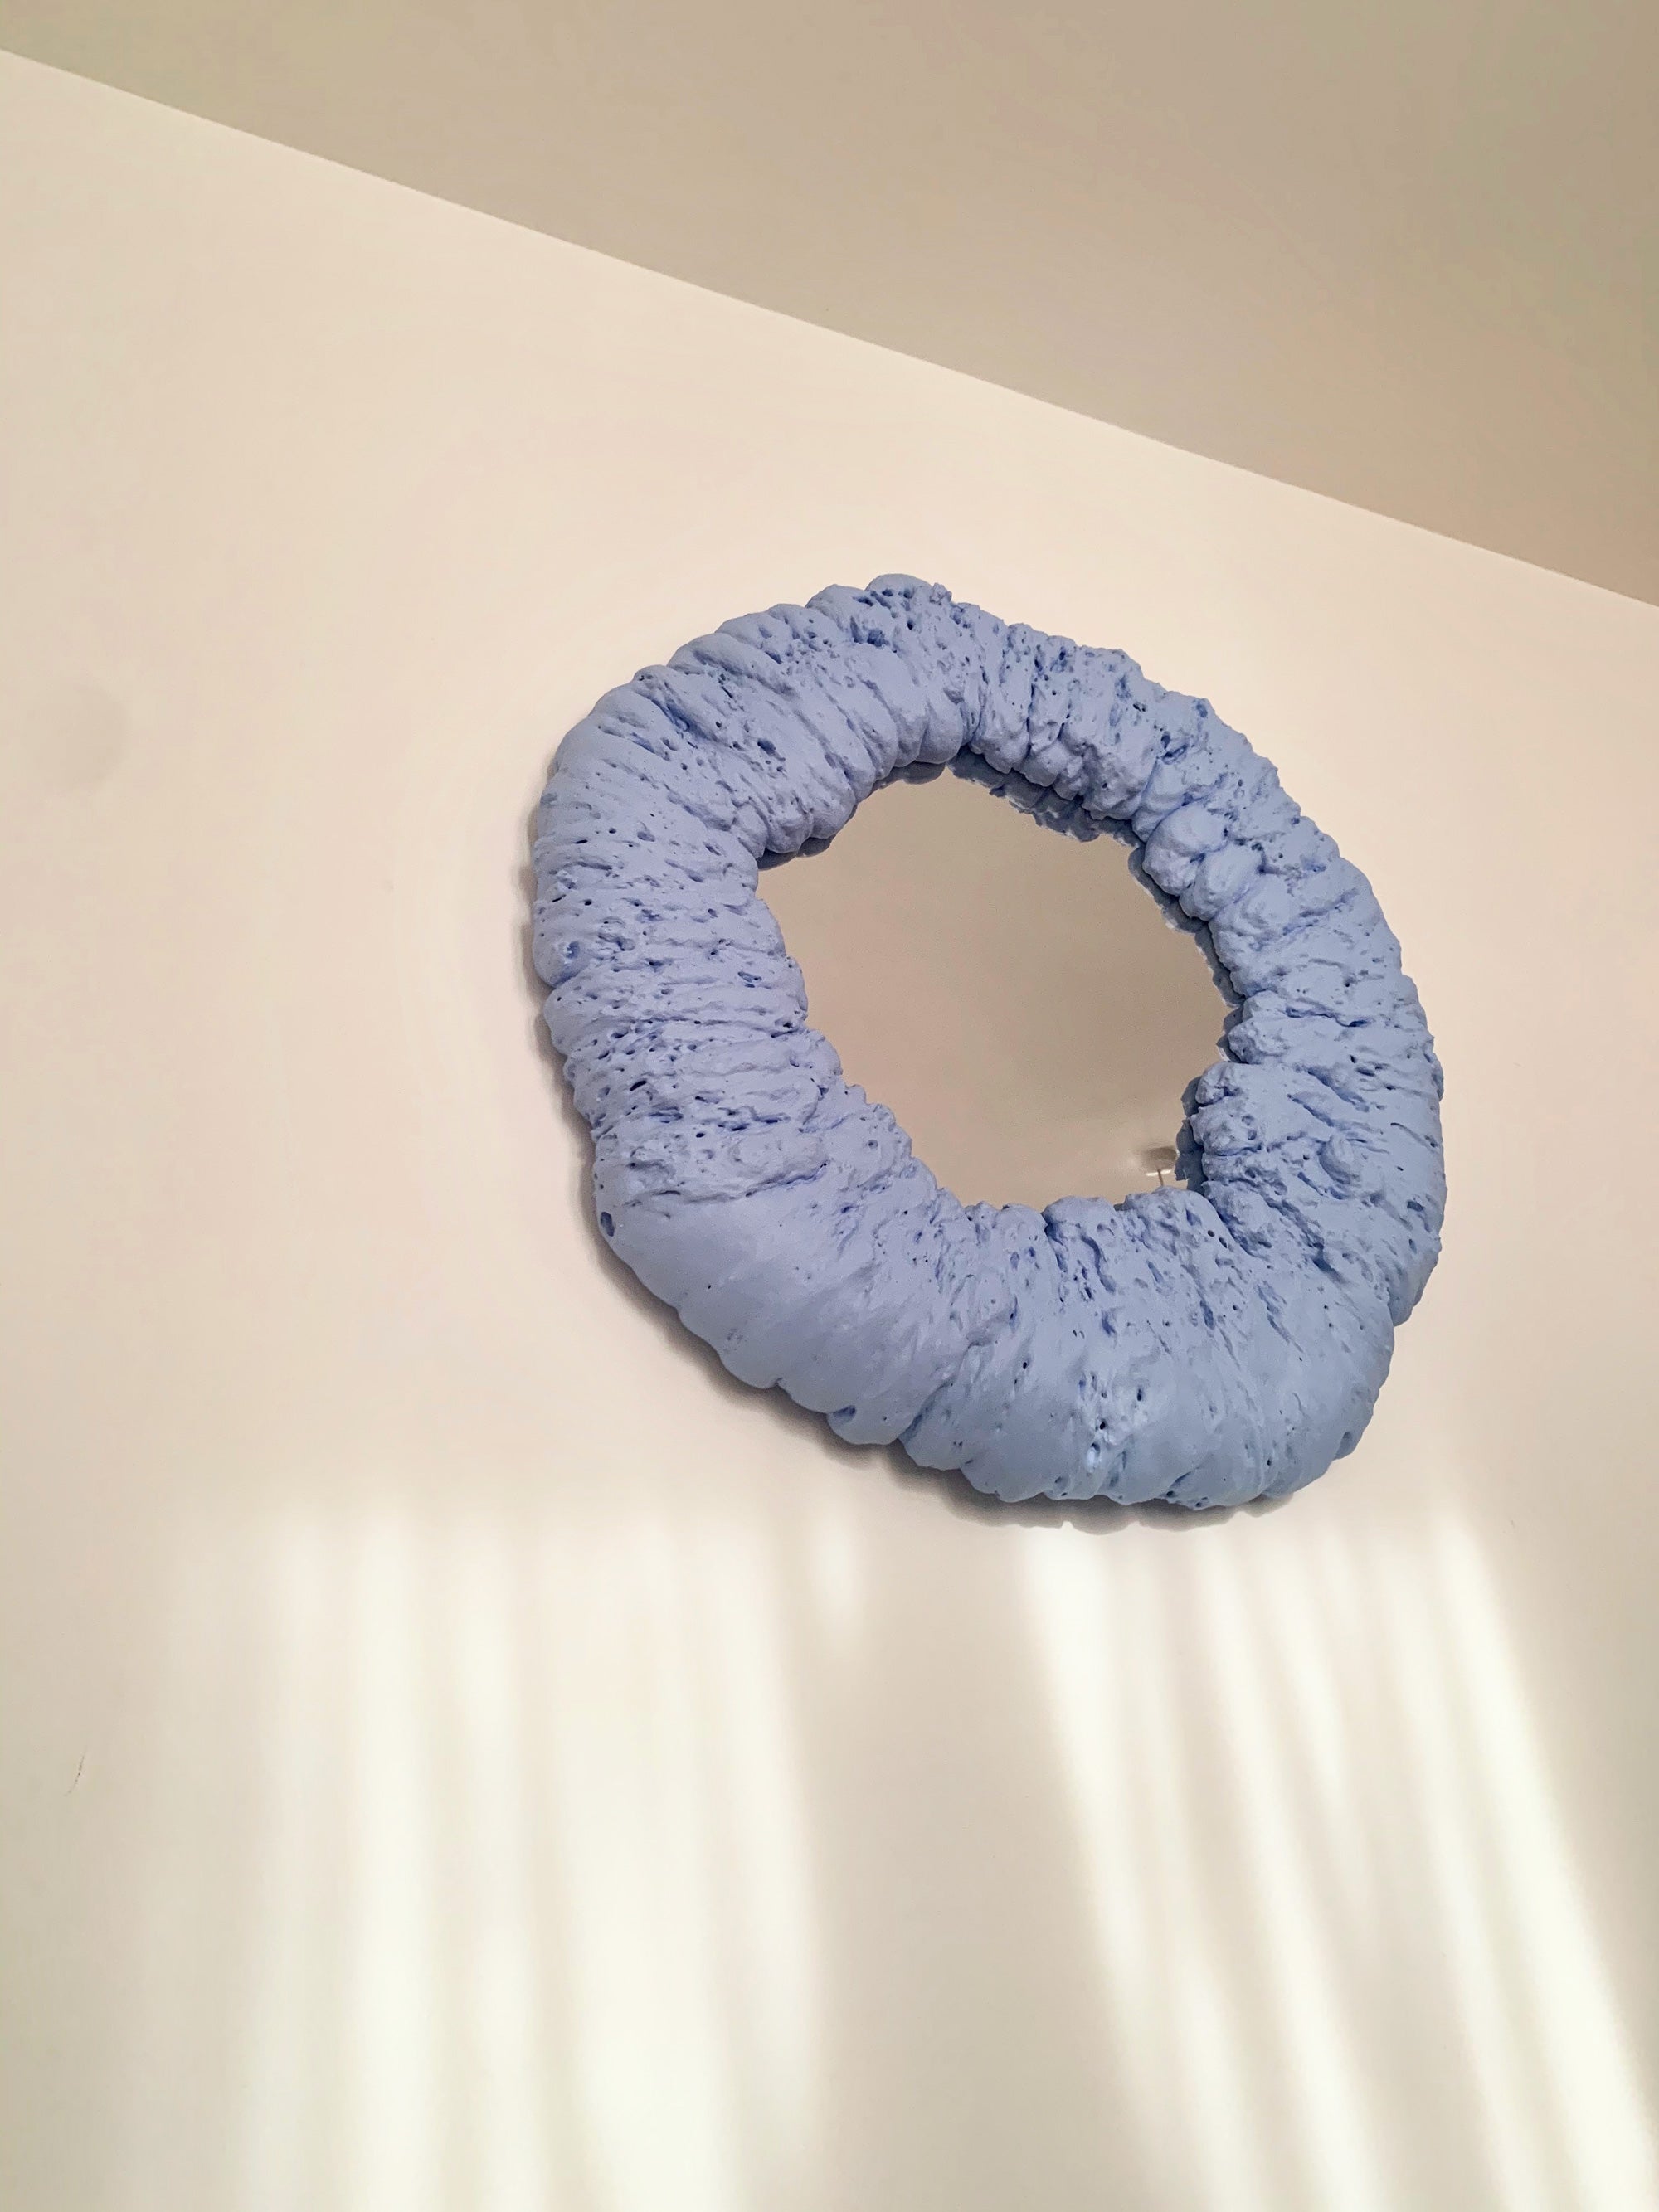
What was the process? We bought a cheap and cheerful circular mirror and some expandable foam. We laid the mirror down on some cardboard and sprayed around the edge in zig-zag motions about 2 inches deep. We let it dry for 30 minutes before tearing the cardboard off the back and painting.
How did you find the DIY? It was dead easy to be honest. We practised some foaming on the cardboard before the mirror to see what the consistency and shape would dry to. We were fools for hand painting it, rather than getting some spray paint and covering the mirror with masking tape – it took forever. We avoided the Instagram pink as it would have looked too much like chewing gum, and although I love green, it would’ve been a bit Shrek-like. We went for sky blue which is calming.
What did you think of the results? I love it! We’ve had mixed reactions but it’s a big cloudlike cartoon that turned a boring mirror into a playful, fun element in our bedroom.
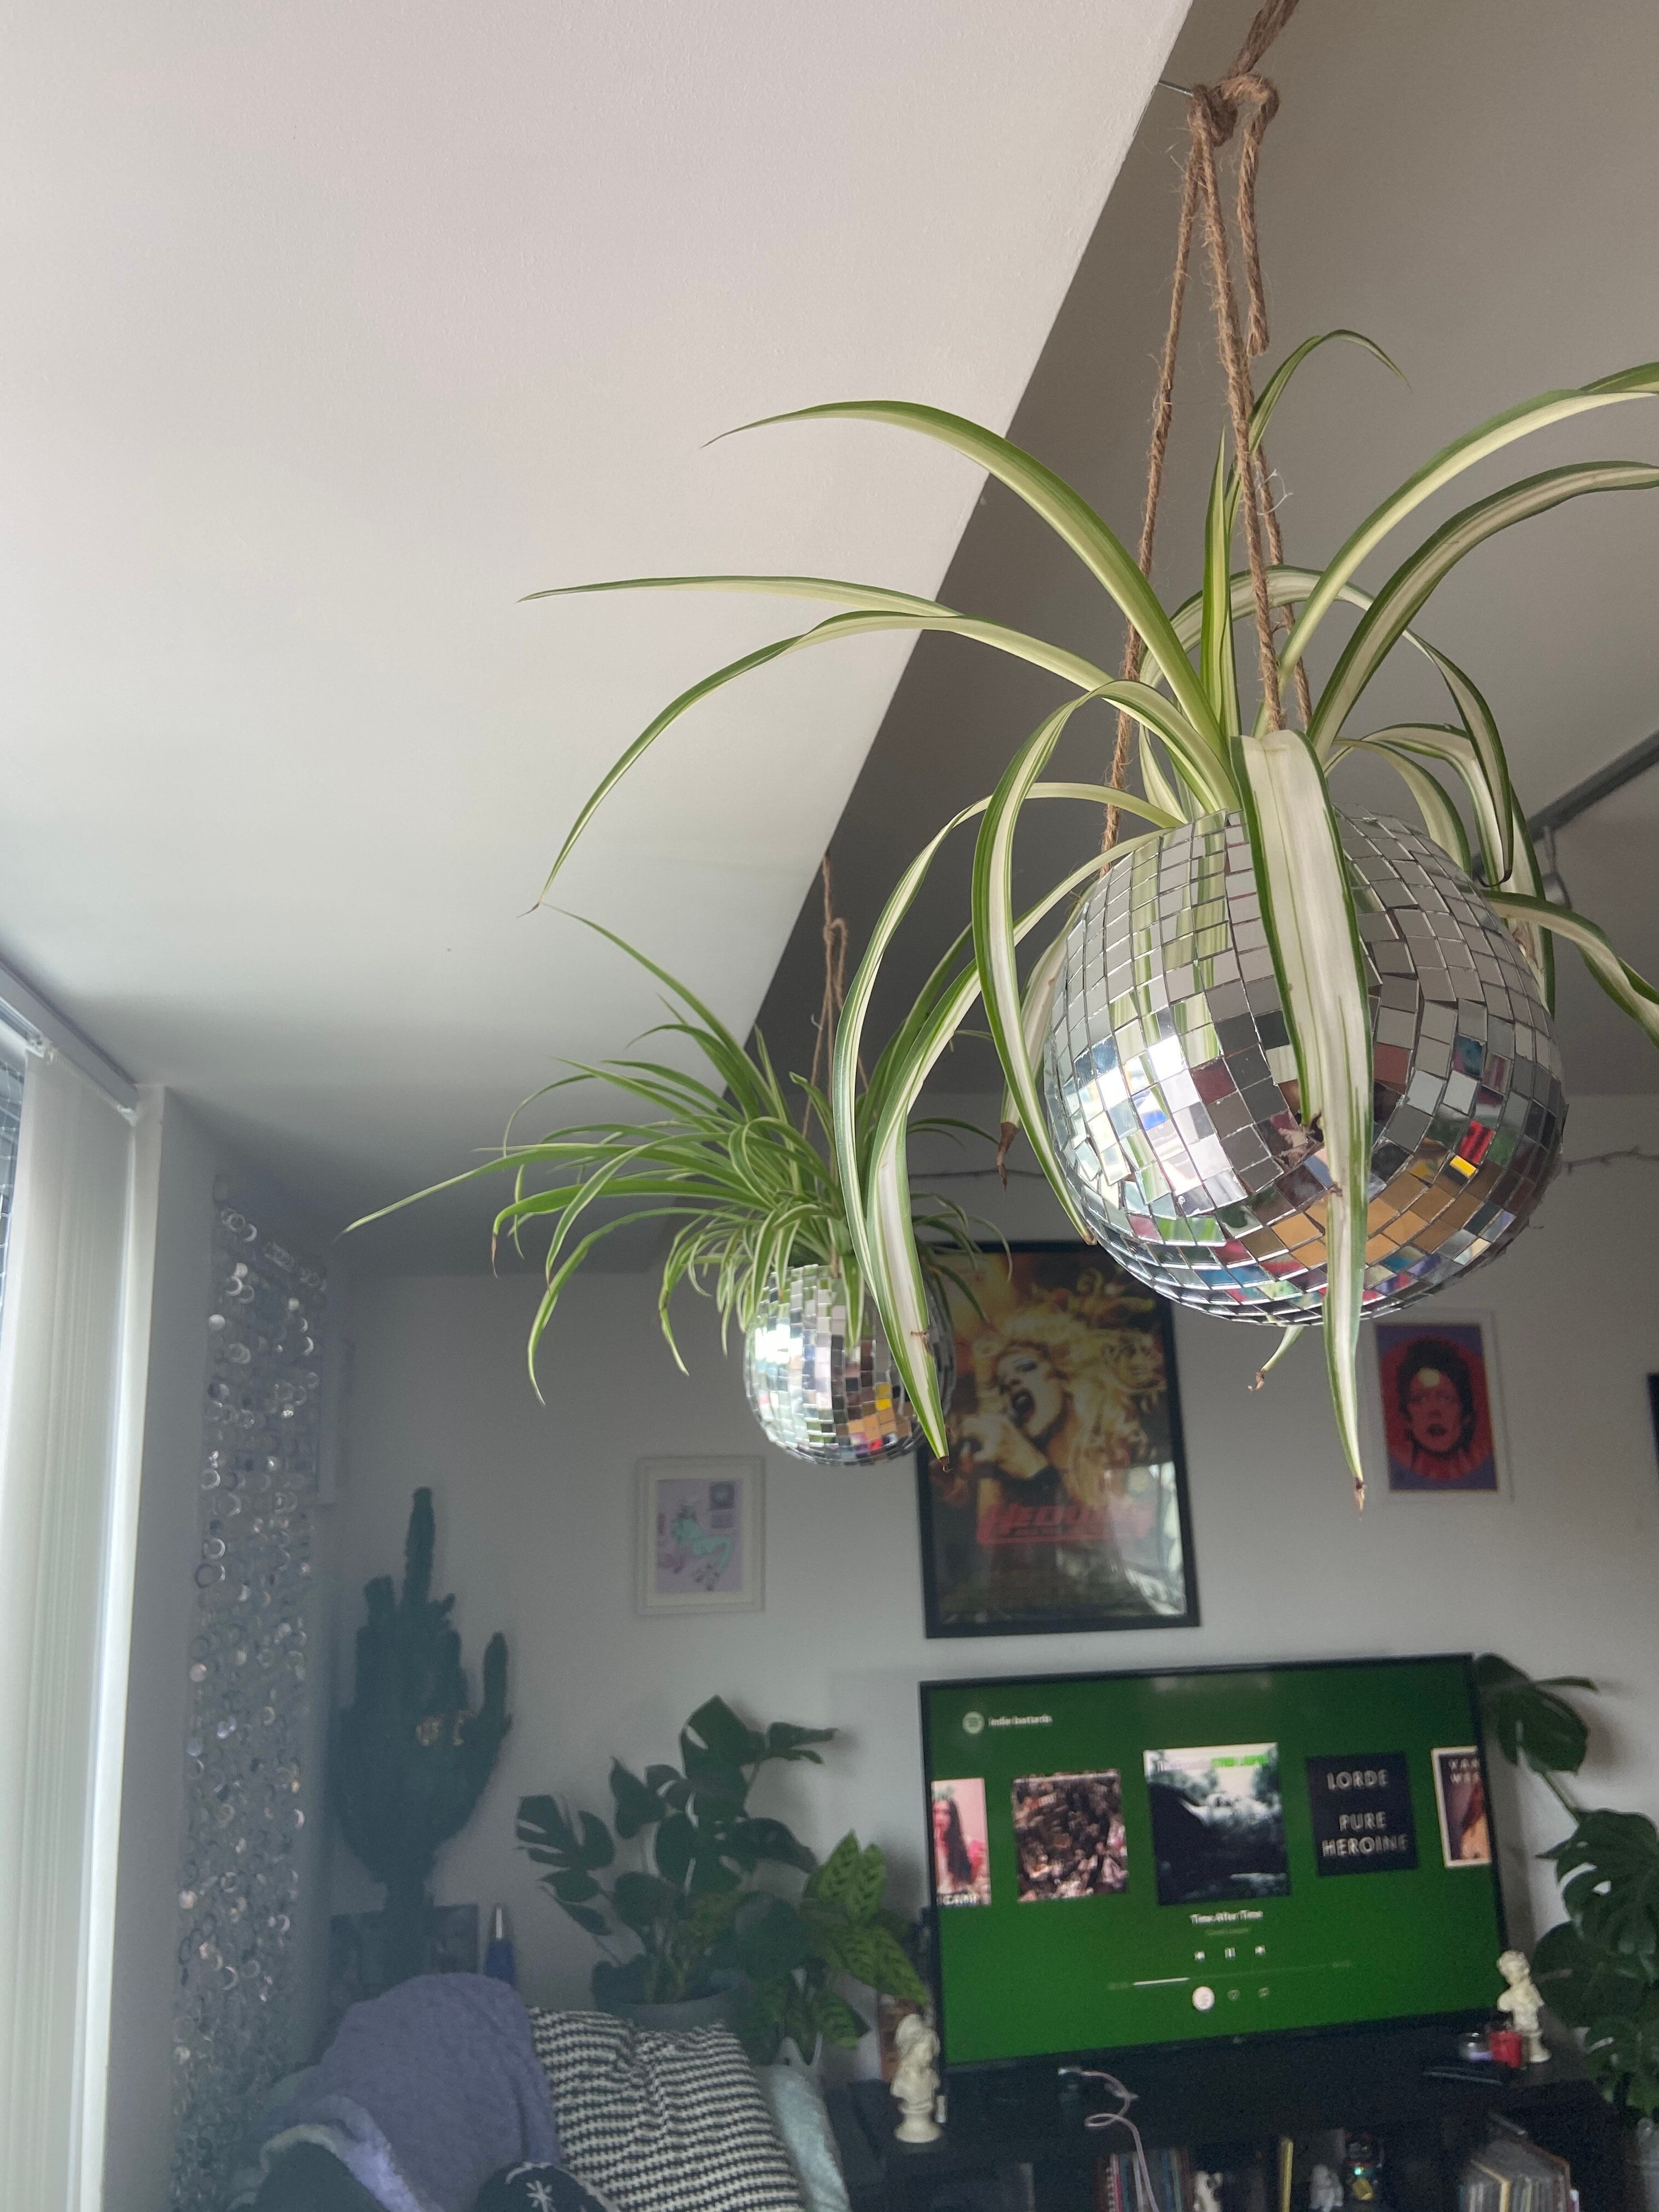
What was the process? I used cheap terracotta plant pots from Wilkinson’s that didn’t cost much and I didn’t like the look of. Using these mirror tile pieces from Amazon, I stuck on the squares in strips to save time until the pot was covered.
How did you find the process? On one hand it was way easier than I’d thought it would be as the pieces I bought were self-adhesive, so I didn’t have to mess around with glue or grout. On the rounded pots I did get a little frustrated where the squares eventually overlapped and look a little messy, but that’s just the Virgo in me.
What do you think of the results? I’m so happy with them! They get lots of compliments and when the sun passes in front of our window, the light reflects in specks all across the room and looks so, so pretty. I also mirror balled my laptop, which was a huge mistake – it’s SO heavy now – and I’m one quarantine away from doing the toaster tbh.
Like what you see? How about some more R29 goodness, right here?
8 Insta Stars Give Us Isolation Interiors Tips