But just because you won’t be seeing some loved ones IRL doesn’t mean that you can’t let them know you are thinking of them. If you’re sending gifts through the mail this year, it can be tricky to find presents that won’t cost an arm and a leg to post. Happily, we’ve got a selection of small trinkets that can be easily sent in a standard A4 envelope. And if that isn’t enough to reel you in, all the gifts are DIY, meaning significantly less money – and way more fun.
Not only is there something special about giving the ones you love a gift you’ve made with your own two hands but with the purse strings extra tight this year, DIY crafts allow you to batch-make presents, helping your pennies go further this Christmas. From clay incense holders to marbleised coasters, there’s something to suit everyone on your list this festive season.
Click through the slideshow ahead to discover how to create our top selection of small DIY gifts…
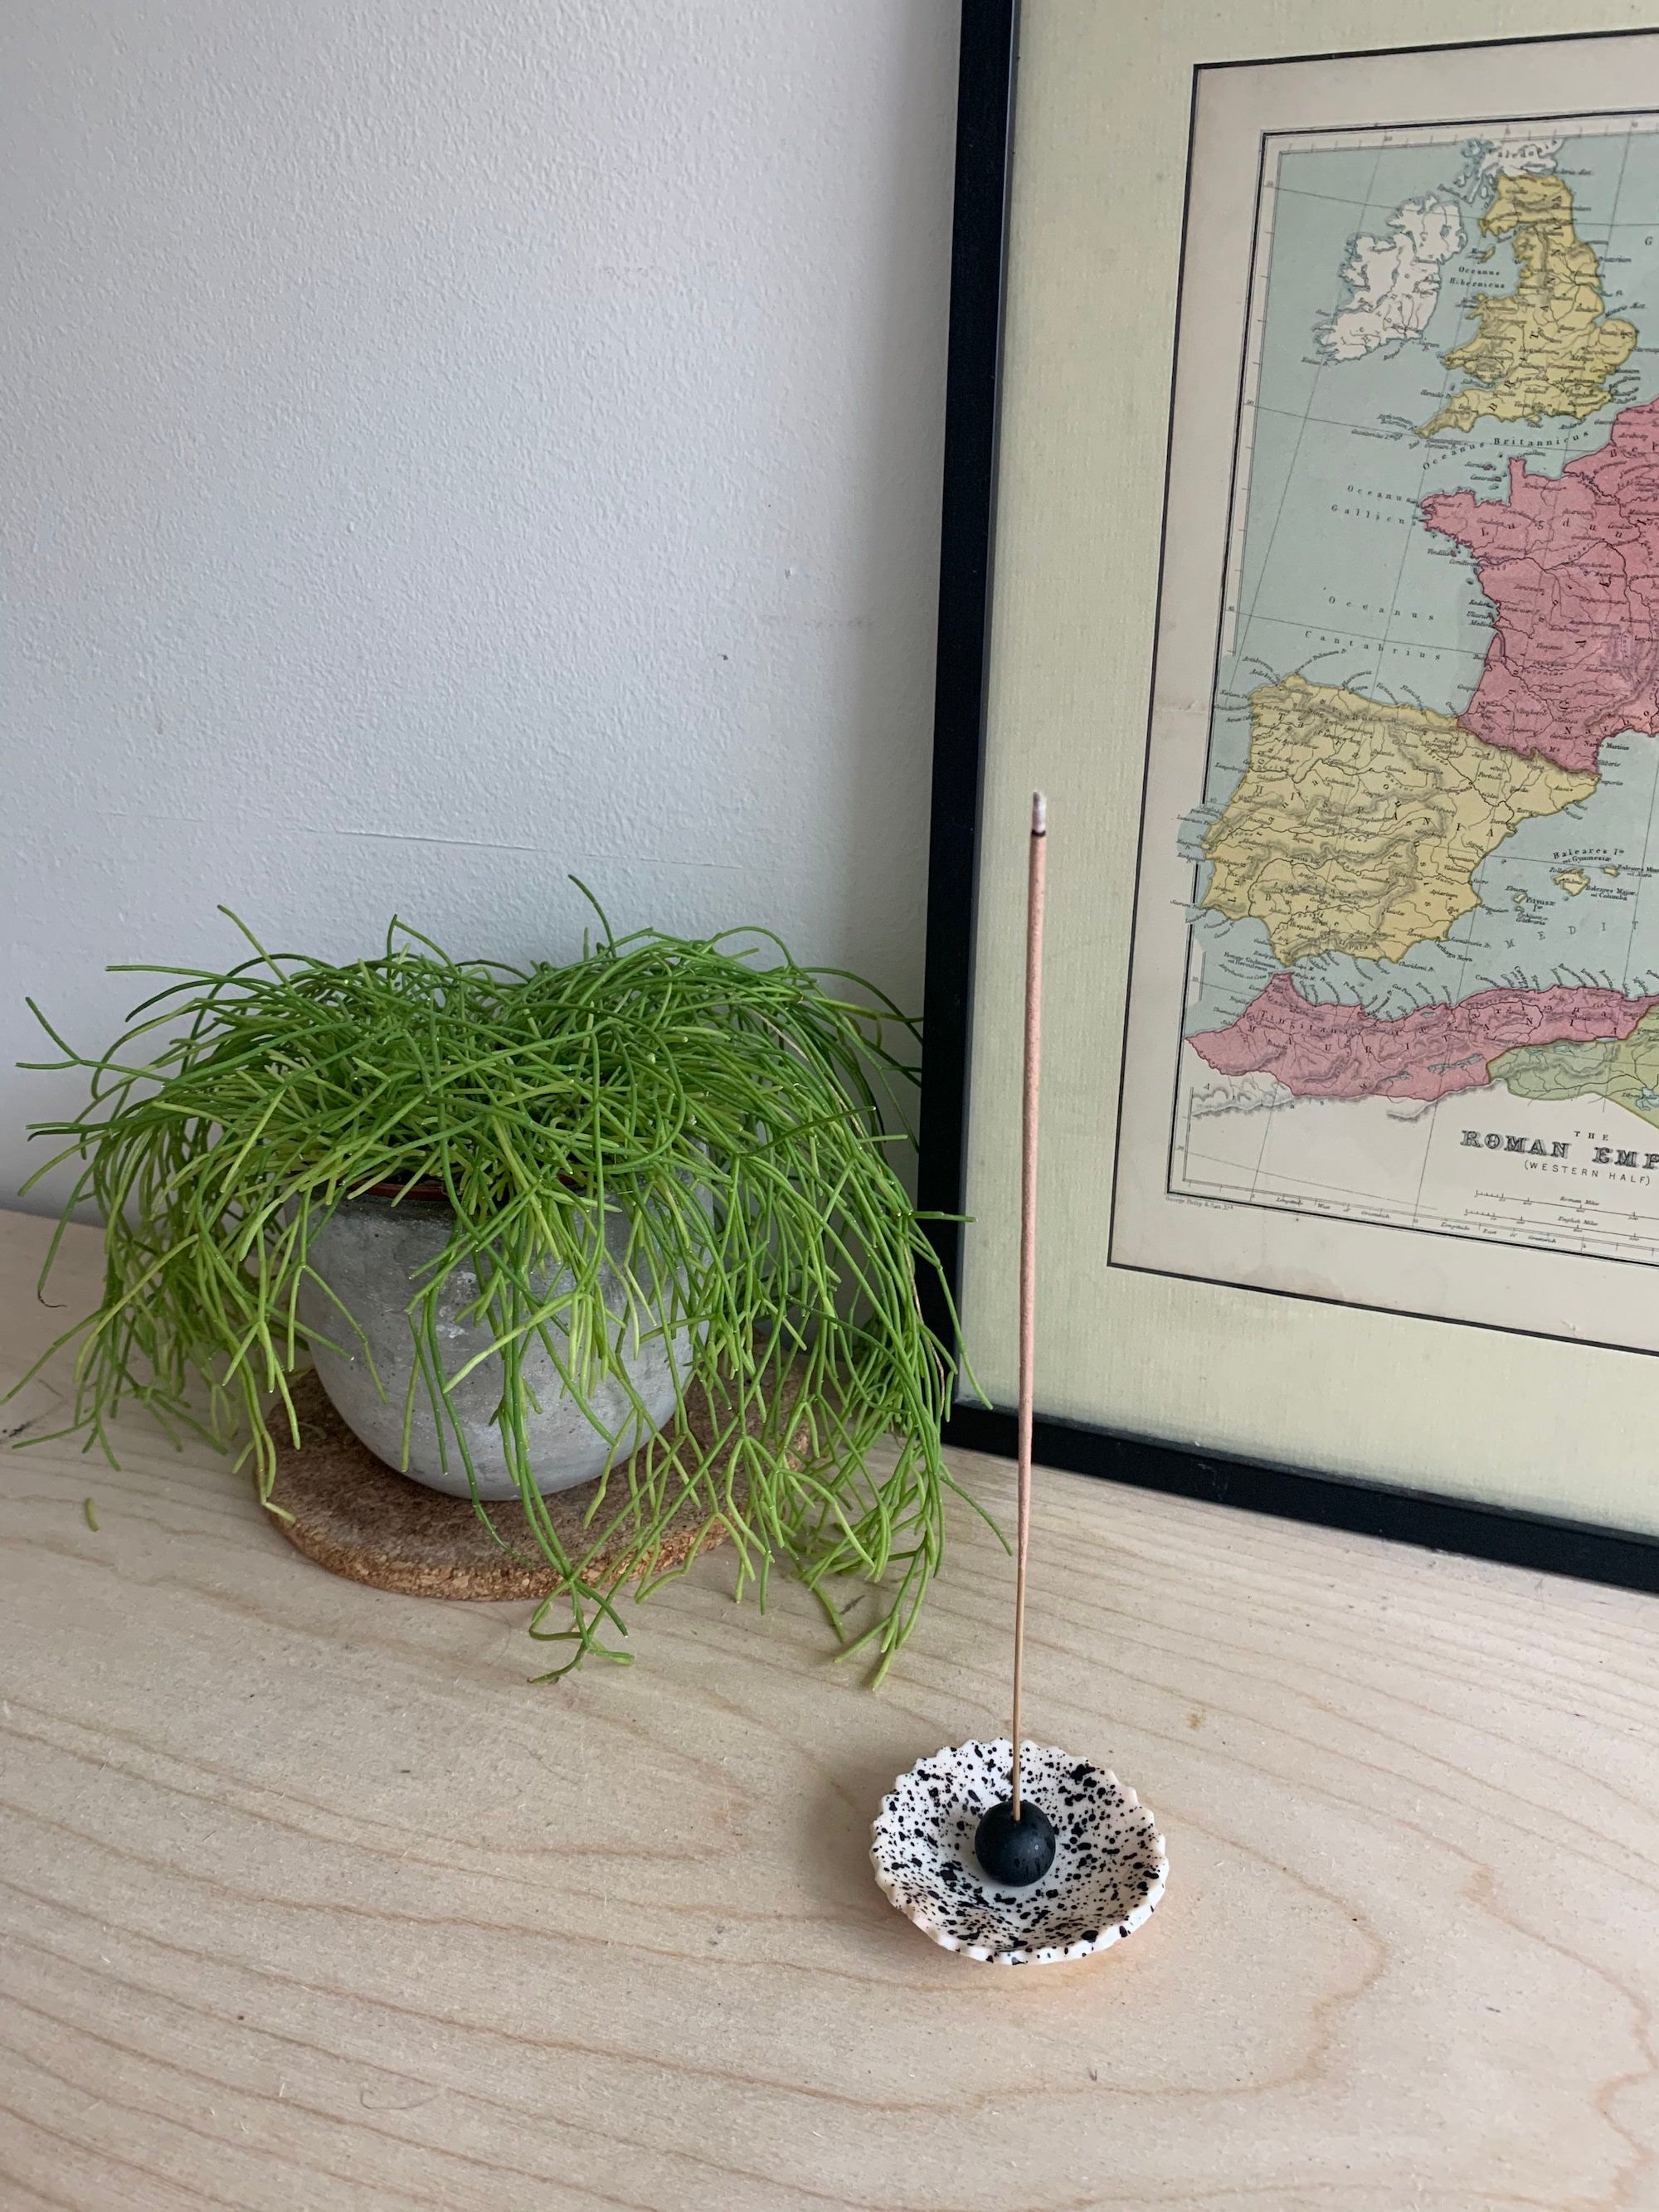
Spotty Incense Holder
Tools needed: White polymer clay, black acrylic paint, scalloped cookie cutter and a toothpick.
Instructions: First roll out your clay until it’s around ¼ inch thick. Then take your largest cookie cutter and cut out your circle shape. Then take some leftover clay and roll it into a small ball. Poke the sphere with a toothpick (or simply poke with your incense stick) to create a hole. From there place your ball firmly into the middle of your scalloped circle. Then place your creation into a small ovenproof dish so that the edges are touching the sides and the bottom has space to dip down into a curved shape. Now bake in the oven as per the clay instructions (normally 180 degrees for around 10-15 minutes). After letting your incense holder cool, load your paintbrush with black acrylic paint and start to splatter onto the clay. Leave to dry before lighting your favourite incense.
Difficulty level: 5/10
Cost: £3ish
Inspo: If you don’t fancy adding paint into the mix, follow Kristin Prough’s lead and roll in tiny pieces of coloured clay to create a terrazzo effect (she also used a glued-on bead in the middle for added texture).
Gifting: Pack in tissue paper alongside a selection of your favourite incense sticks.
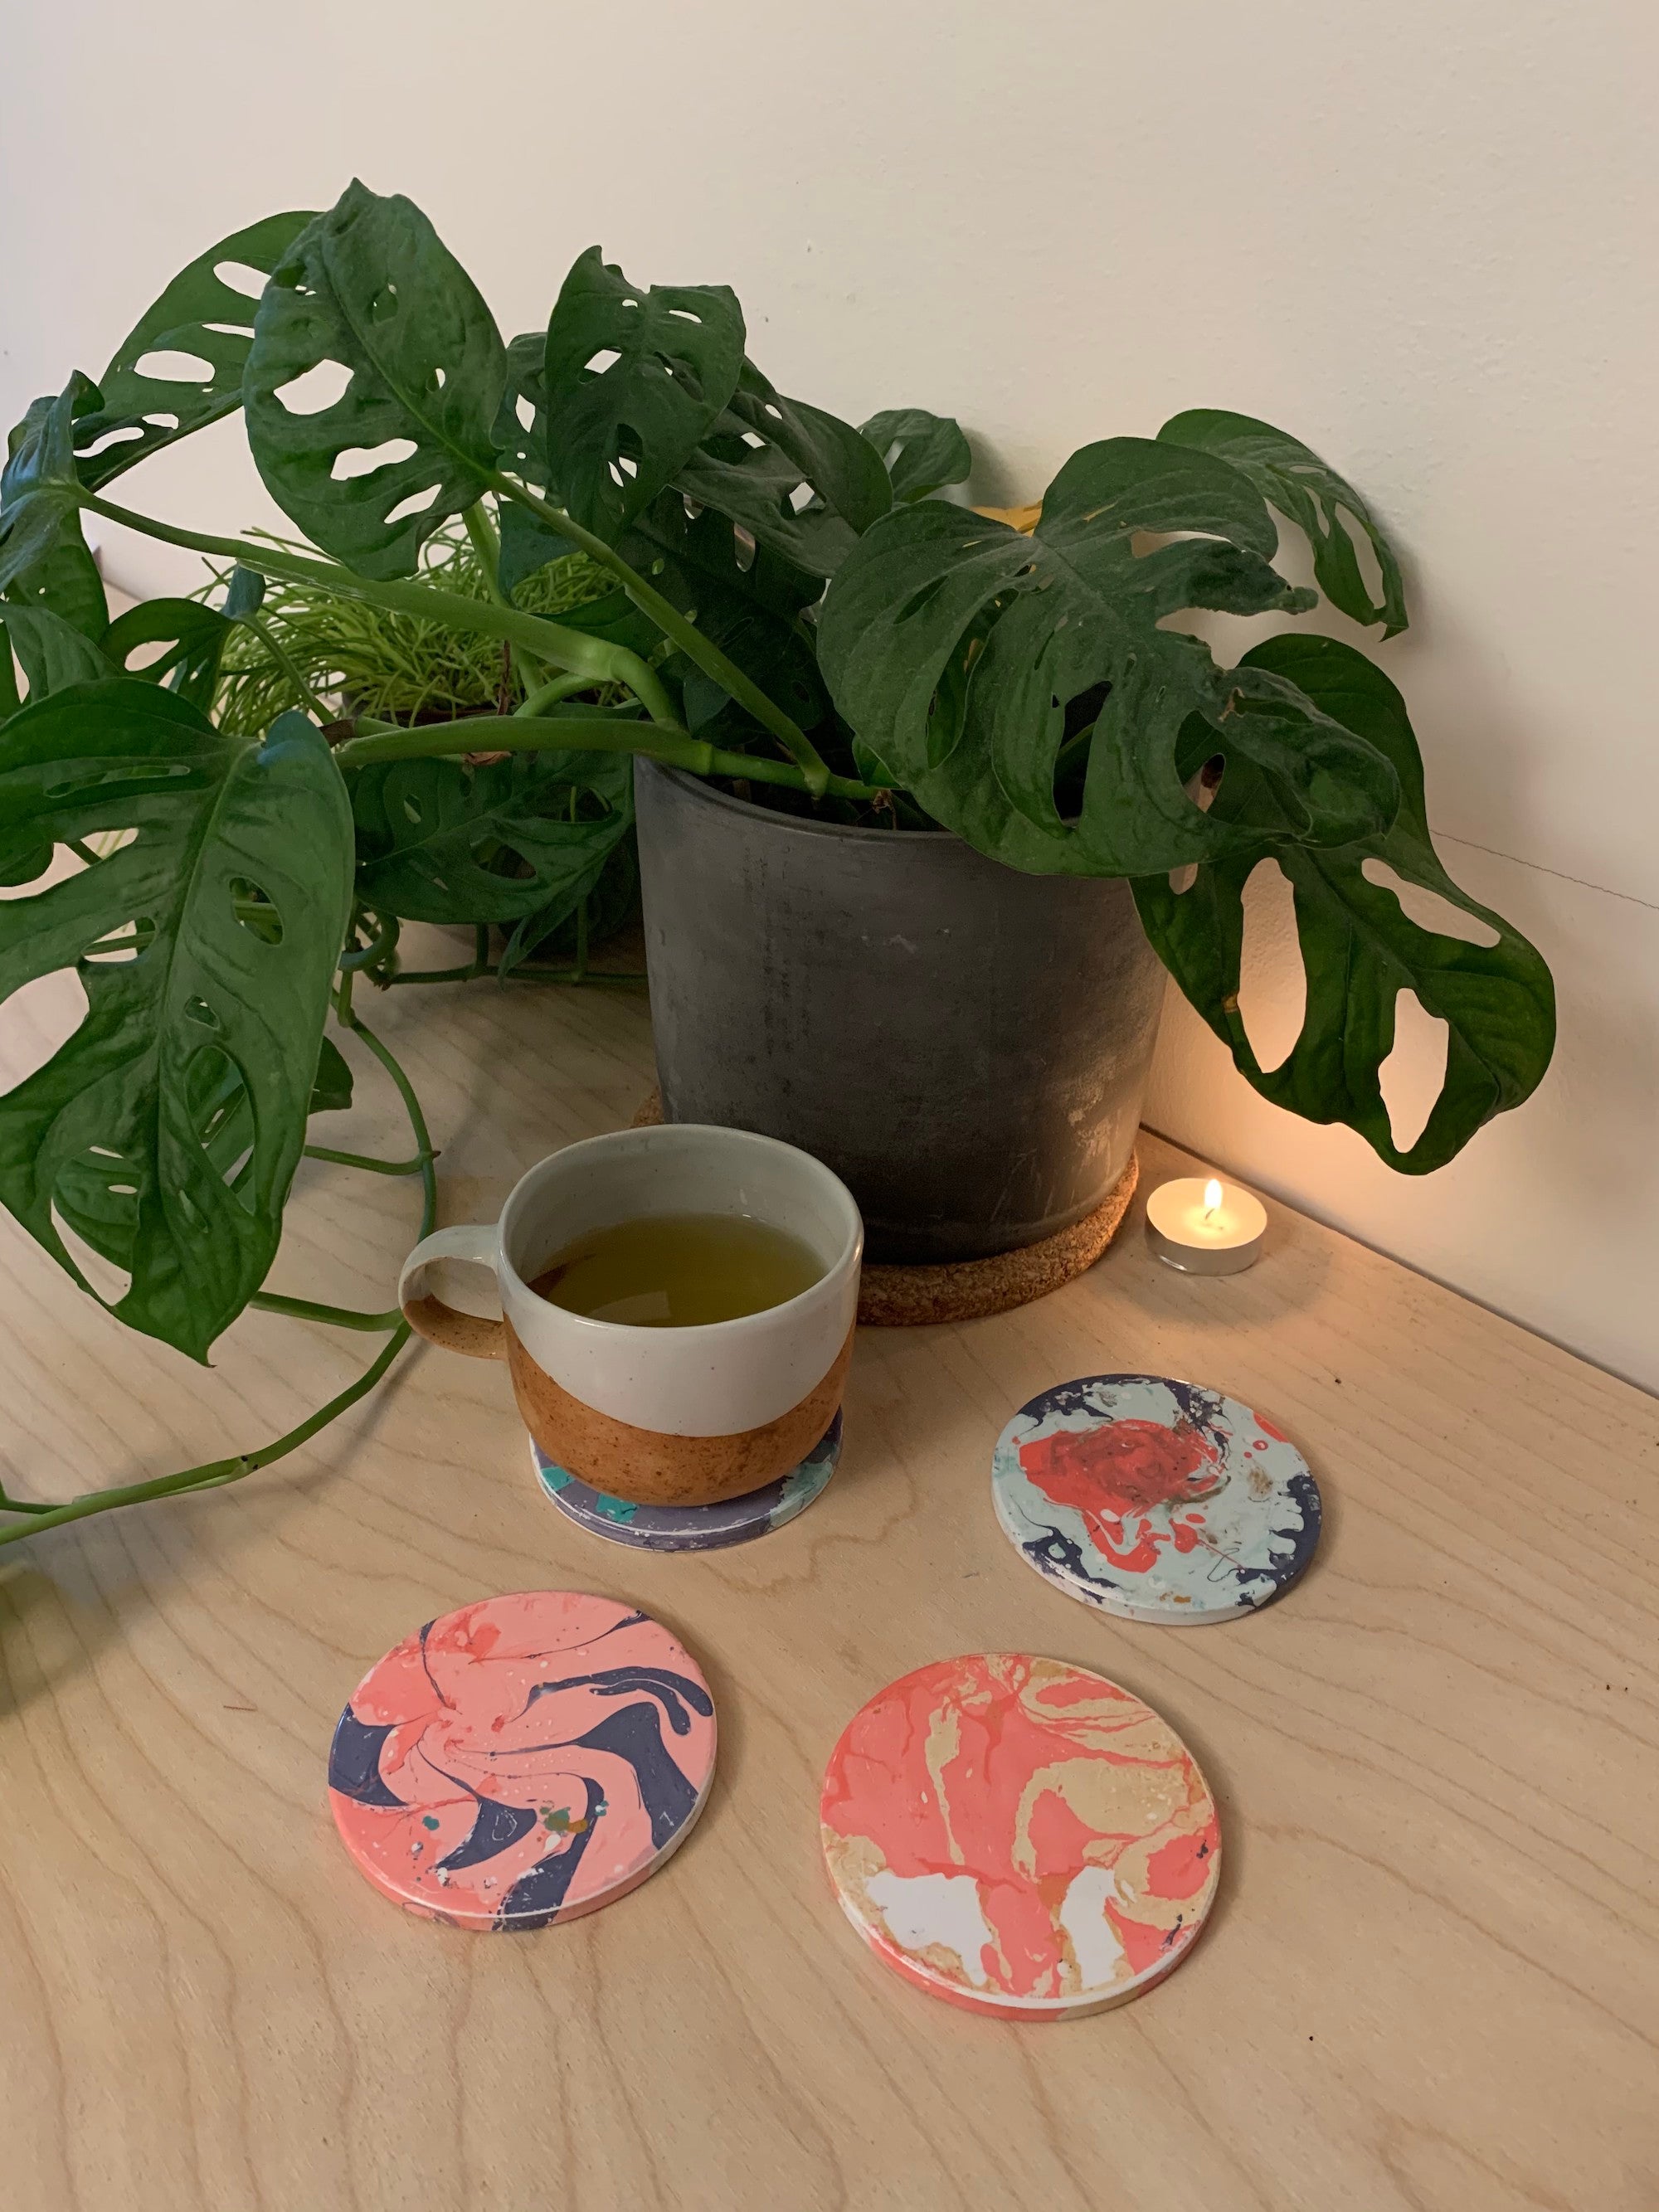
Marble Coasters
Tools needed: Marble paint assortment, plain ceramic coasters, big bowl and a toothpick.
Instructions: If you ever marbleised paper in school, then this is pretty much the same deal. After filling a bowl halfway with water, choose two or three paint colours and start dropping blobs onto the water. Once you have a puddle of circles, take a toothpick and carefully swirl the colours together to create a marbleised effect. Then gently place your coaster into the water and onto the surface of the mixture. Take out to reveal your pattern and allow to thoroughly dry before using.
Difficulty level: 4/10
Cost: £2.50ish
Inspo: For colour combination inspiration, look no further than Zeena Shah. She has a full Instagram highlights dedicated to paper marbling but you can peep her marble coasters and vases tutorial here.
Gifting: Tie four coasters together with metallic string for the perfect ‘just bought from the store’ look. (Remember to send them in bubble wrap!)
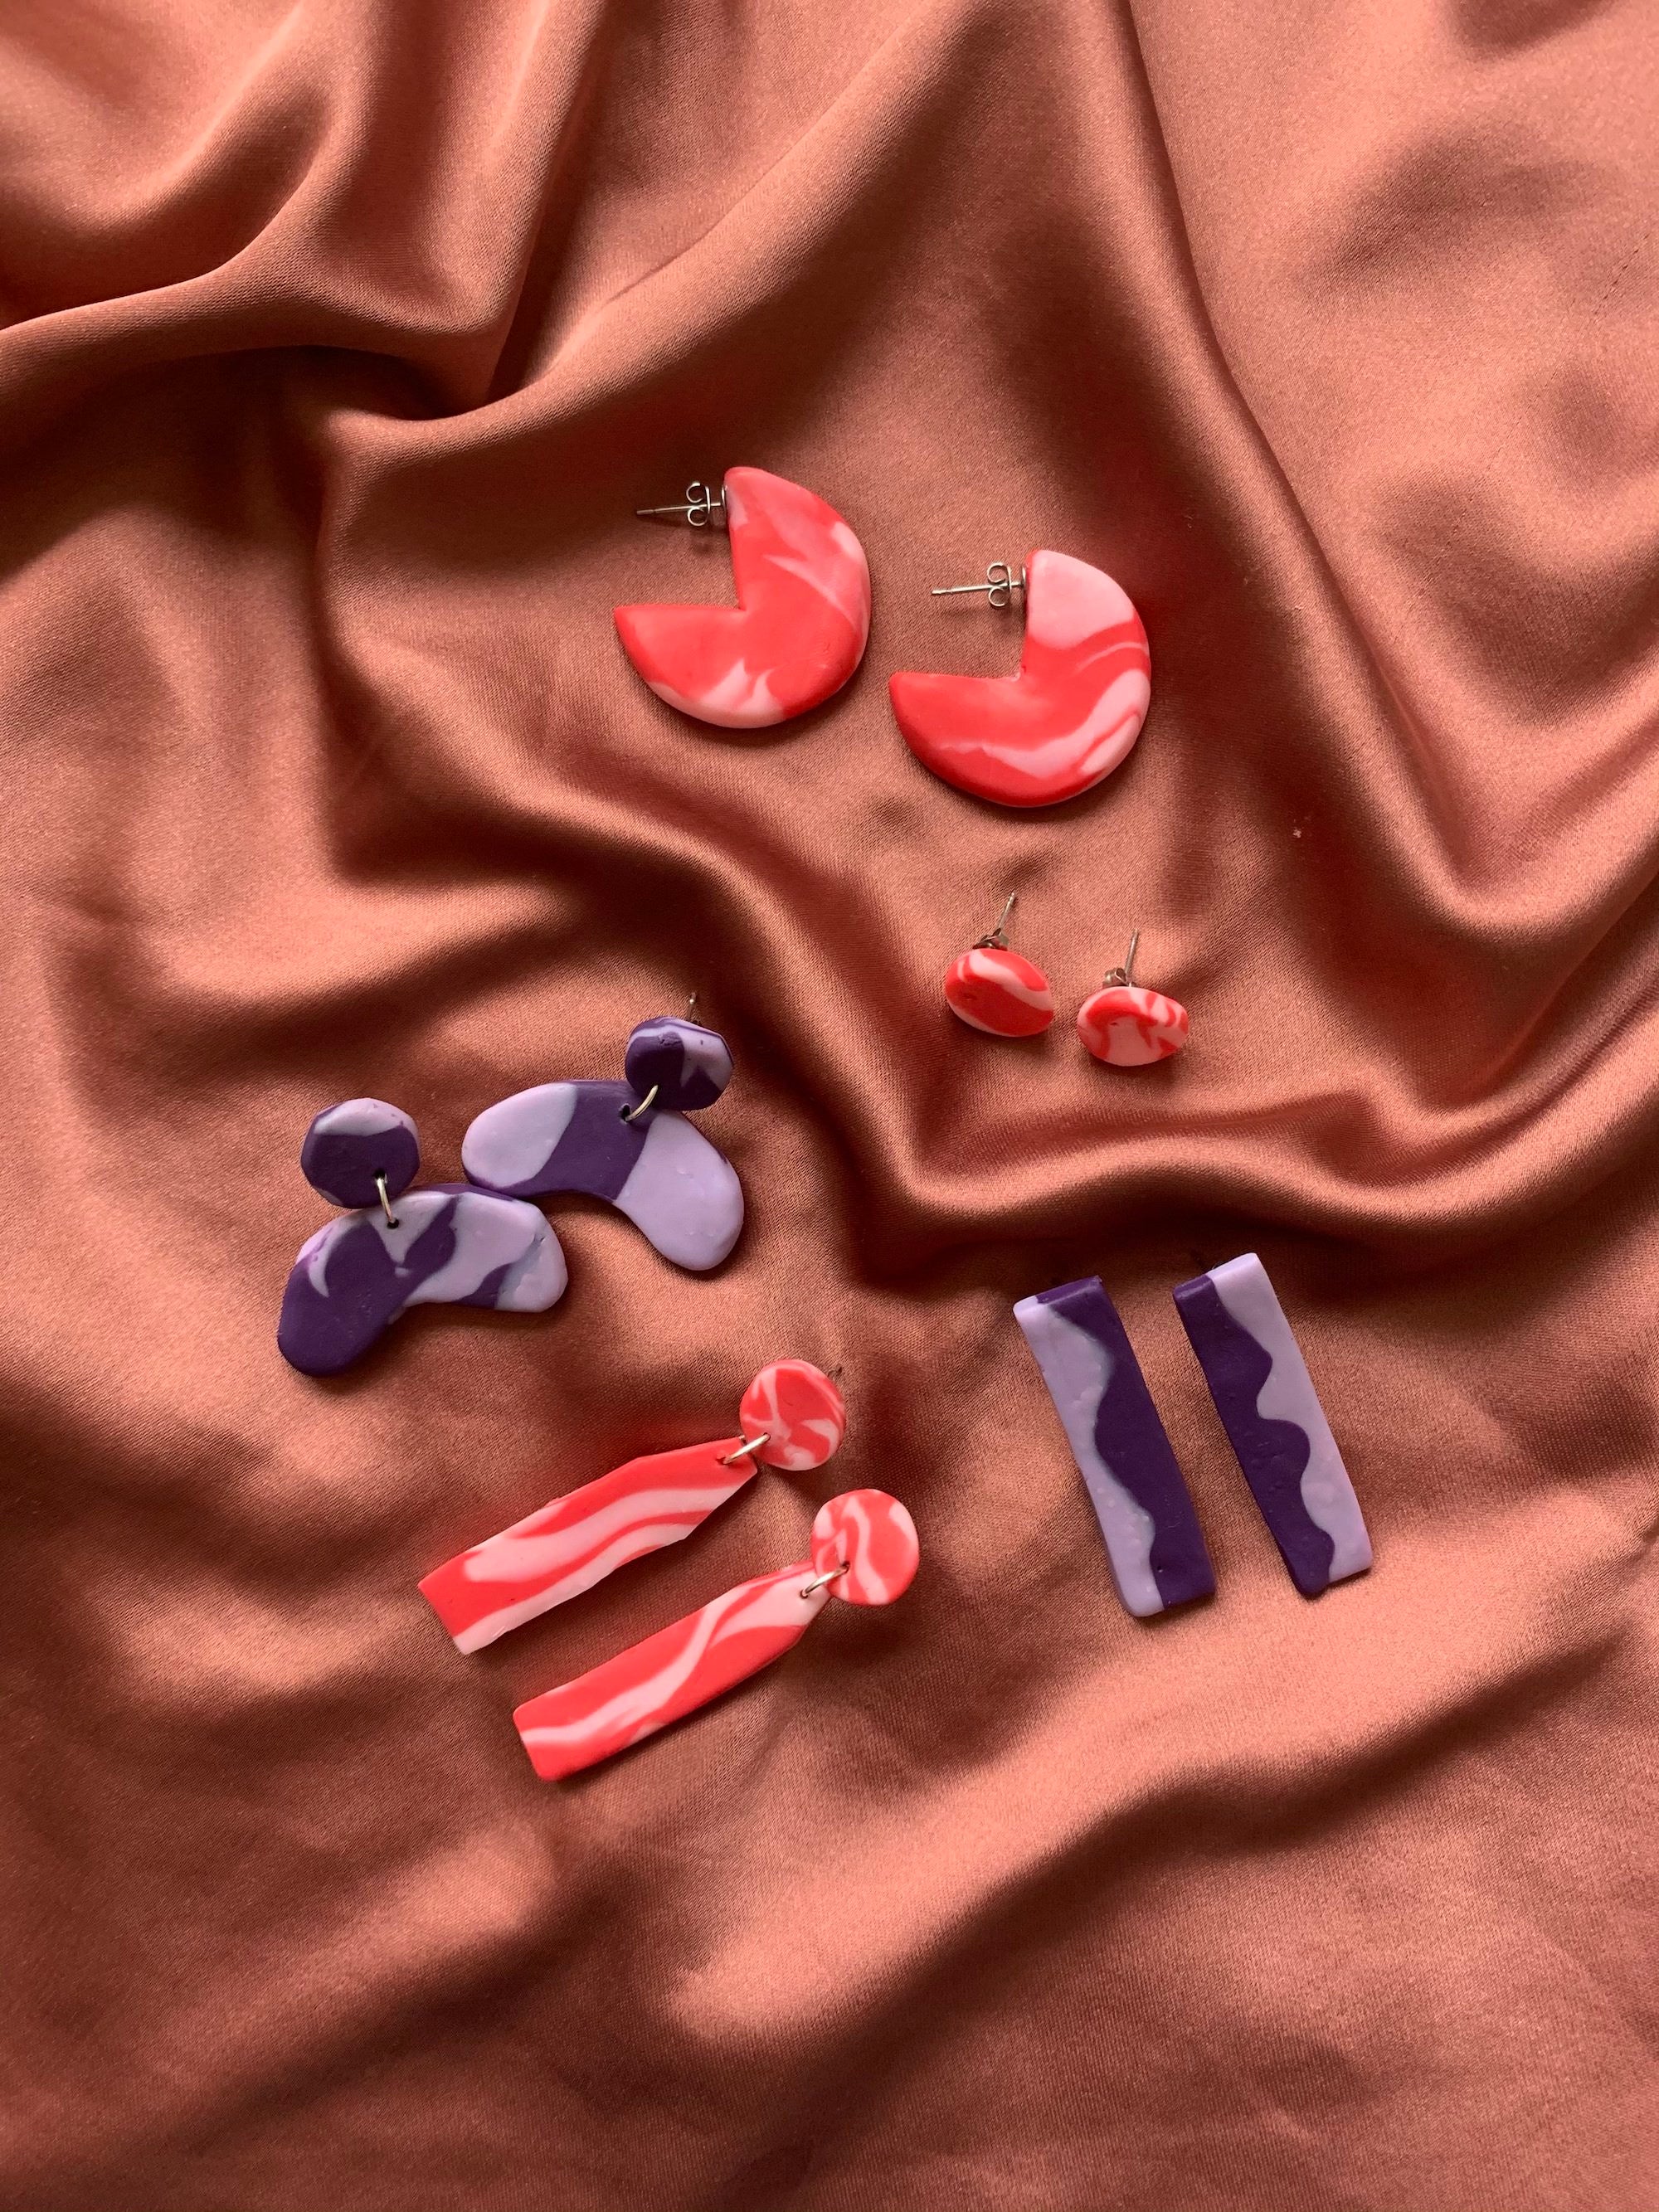
Clay Earrings
Tools needed: Multiple polymer clay colours, jump rings, earring studs, super glue and a rolling pin.
Instructions: The easiest way to approach this is by cutting out your chosen shapes on cardboard first. If you are going for a tie-dye effect, roll each clay colour piece into a long snake, before braiding together into one long piece and rolling into a ball. Then roll out your combined clay to your desired thickness (make sure they are fairly thin if you are using a jump ring) and cut around your stencil. Smooth the edges with your fingers and place onto an oven tray covered in baking paper. If you have chosen a dangly design (e.g. the kidney shape and circle stud), make sure you add the holes using a pencil before baking to accommodate the jump ring. After baking according to your clay instructions, allow the pieces to cool. If you’re making simple studs, simply take your superglue and glue on your earring backs. If you’re making dangly earrings, then use pliers to open a jump ring and feed through the holes in each piece of connecting clay before finishing with a stud.
Difficulty level: 5/10
Cost: £1ish per pair
Inspo: For more inspiration when it comes to clay earring designs, check out Raising Nobles on Instagram for a full IGTV tutorial.
Gifting: Take an old cardboard jewellery box, fill with shredded tissue and personalise by painting your recipient’s initials on the front.
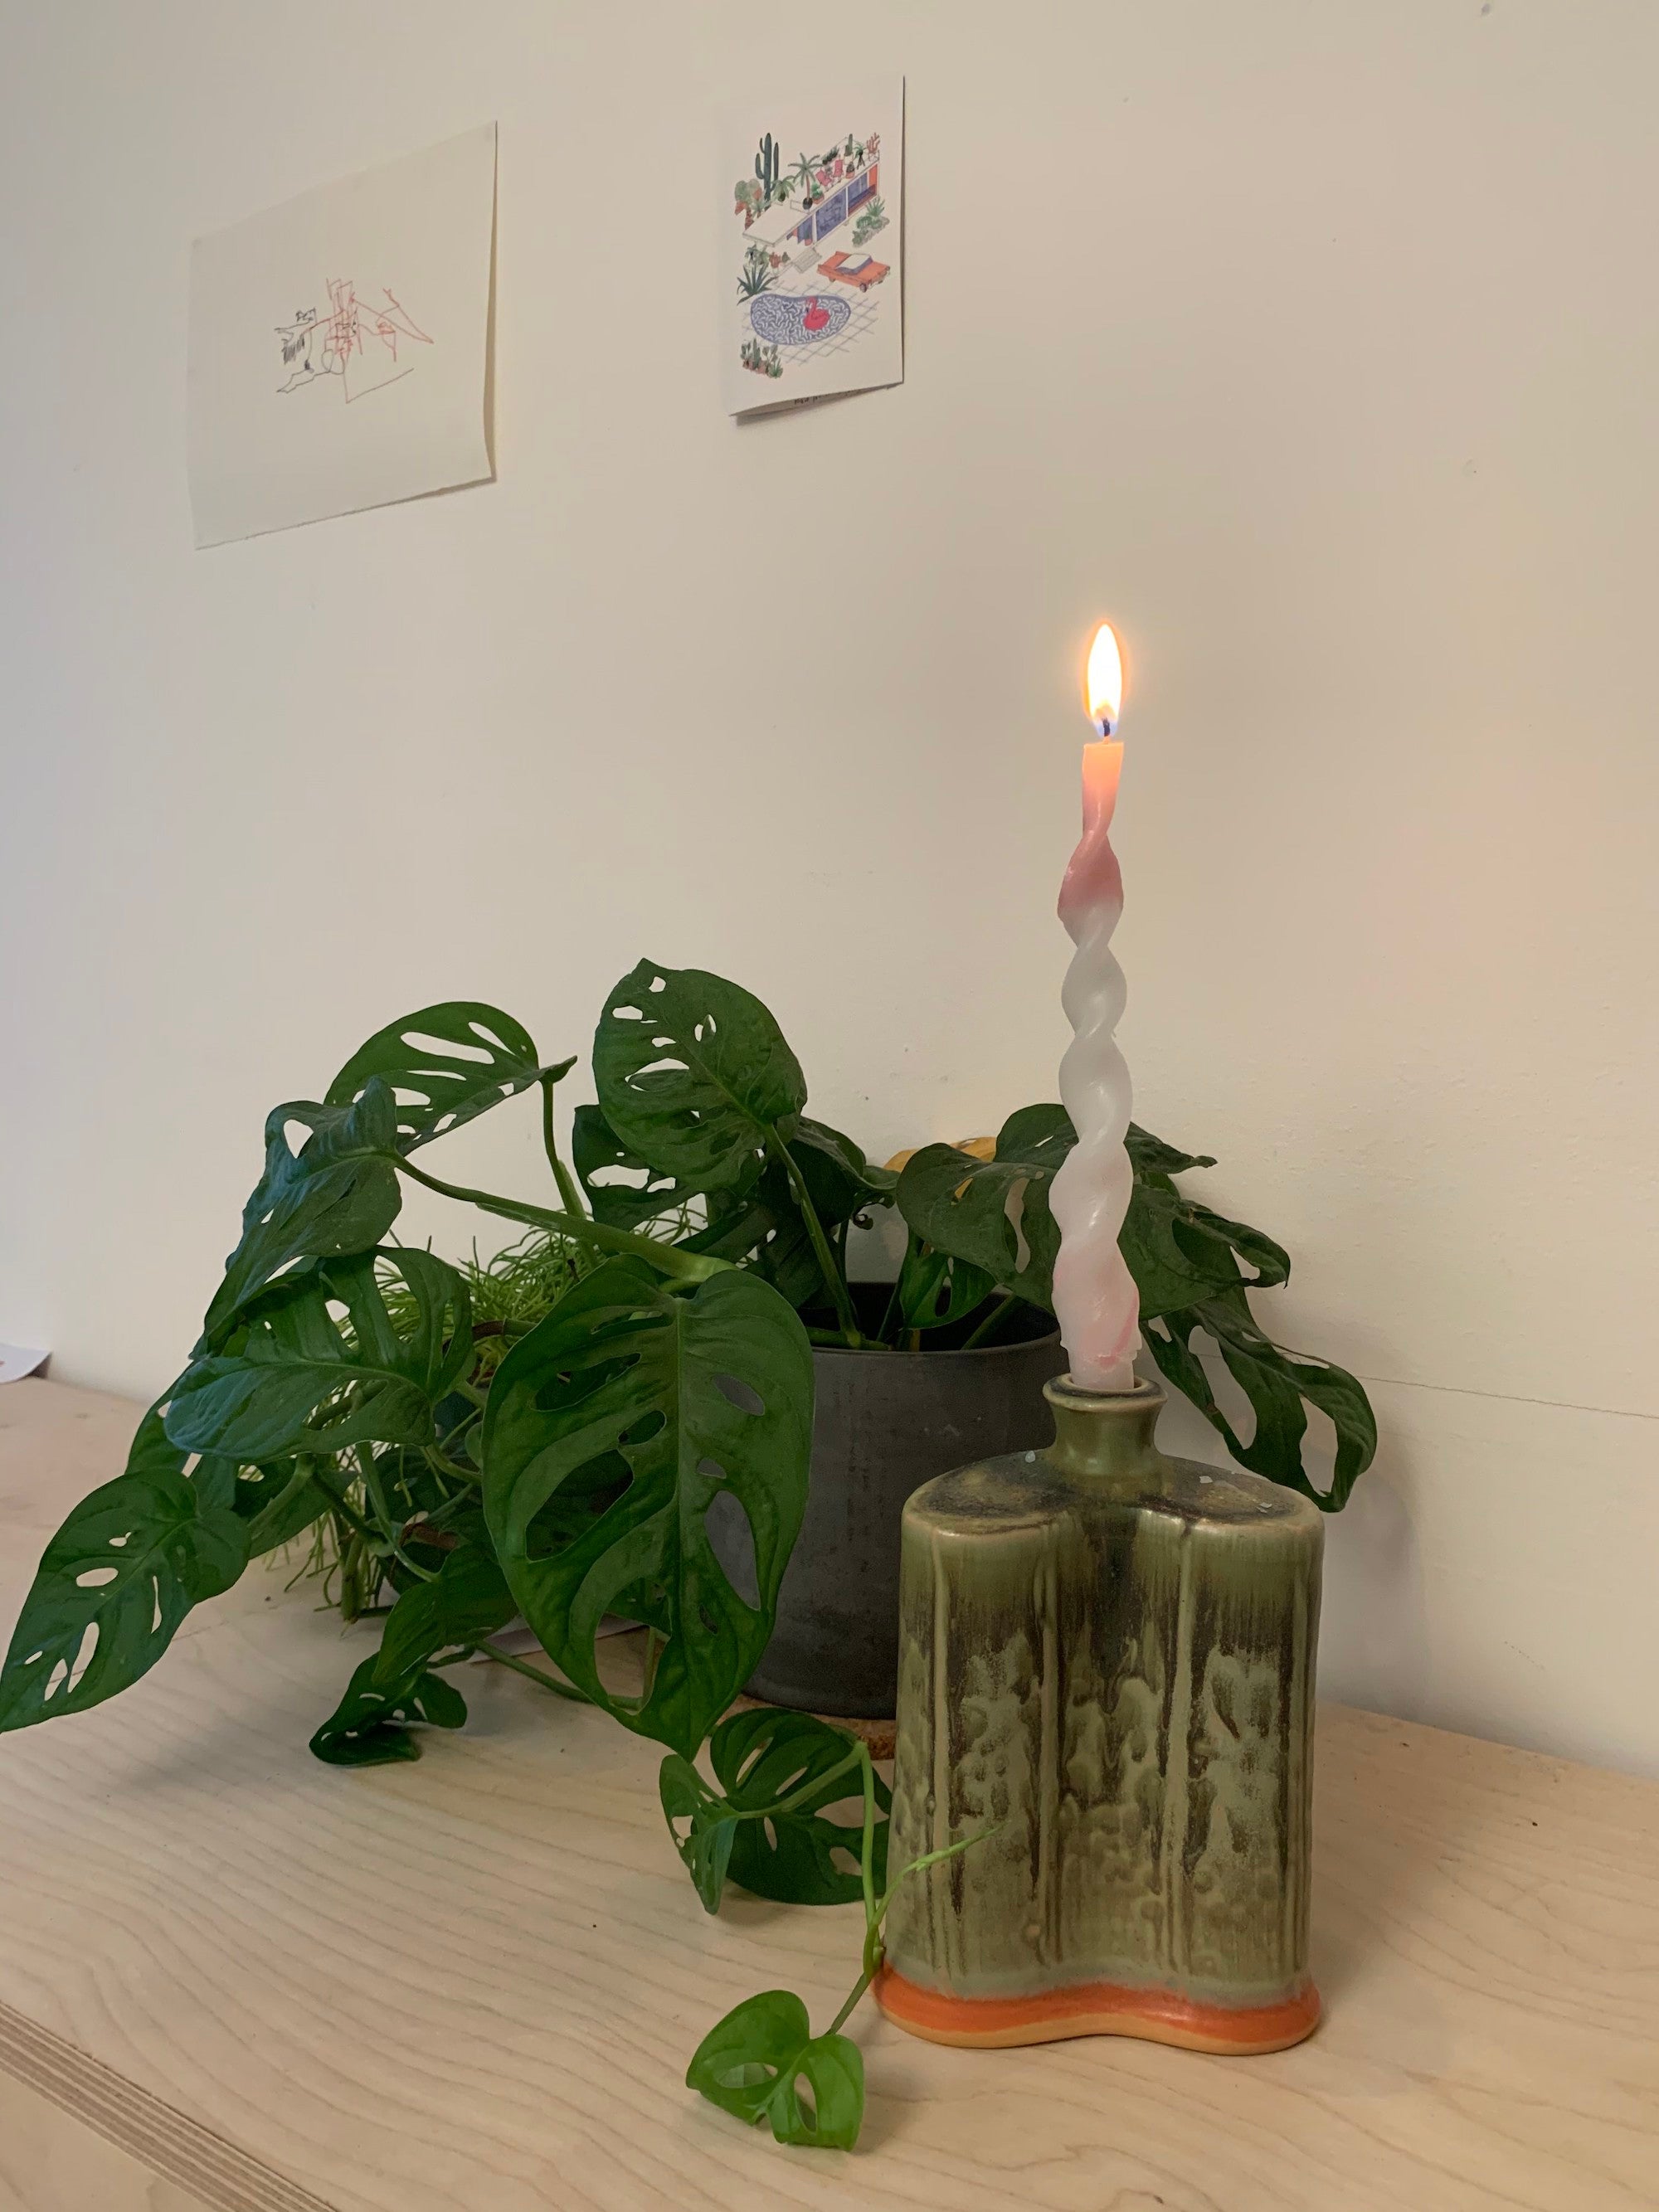
Twirly Candles
Tools needed: Good quality dinner candles, tall Mason jar and a candlestick holder.
Instructions: Start by filling up a tall Mason jar with boiling hot water and popping in your dinner candles. After a few minutes, remove the soft candles with tongs and begin flattening down the wax with your hands or a rolling pin. Once sufficiently squished, twist the candle from both ends, before physically manipulating each twist individually. Then quickly place your creation into the candlestick holder to shape the base while the wax is still warm. Voilà.
Difficulty level: 6/10
Cost: £1.30 per candle
Inspo: To take a look at a true candle-crafting pro, check out Johanne Kohlmetz’s video tutorial.
Gifting: Tie a selection of candles together with raw string for a shabby chic feel.

Satin Scrunchies
Tools needed: Satin fabric, a sewing machine, safety pin, 6mm flat elastic, tape measure and fabric scissors.
Instructions: First of all, choose the size of the scrunchie you want and cut your fabric to fit those dimensions. For oversized cut to 8 inches by 35 inches, for medium 3.5 inches by 23 inches and for small cut to 2 inches by 20 inches. Then you want to fold your fabric widthways in half (with the shiny side facing inwards) and pin down the entire length to keep it in place. Then using your sewing machine, sew a straight stitch down the entire length of the folded fabric (this can also be hand-stitched or hot glued). You should now be left with a fabric tube open at both ends. Then you need to turn the fabric inside out, so the shiny side faces outwards (this is slightly tedious; a pair of tweezers may help here to feed the fabric back through itself). Now measure your elastic to the size of your wrist and cut to that length. Add a safety pin to the end of the elastic and feed it through the tube of fabric. Once you have the safety pin to the other side, you can hand sew both sides of elastic together. Then push one raw edge inside the other before sewing a straight stitch across the fabric to close the seams. You can also finish off by tying any spare material into a knot to create a cute bow.
Difficulty level: 7/10
Cost: £2ish
Inspo: The best part about scrunchies is that they can be made using any material (I used an old skirt FYI). If satin isn’t your style, look to Adriane Vieira’s very handy IGTV tutorial to see how she makes her chiffon designs.
Gifting: Choose three scrunchies in various sizes and send with a selection of cute hair clips to help keep baby hairs in place.
Like what you see? How about some more R29 goodness, right here?
Homeware DIYs We Saw On Instagram & Did Ourselves